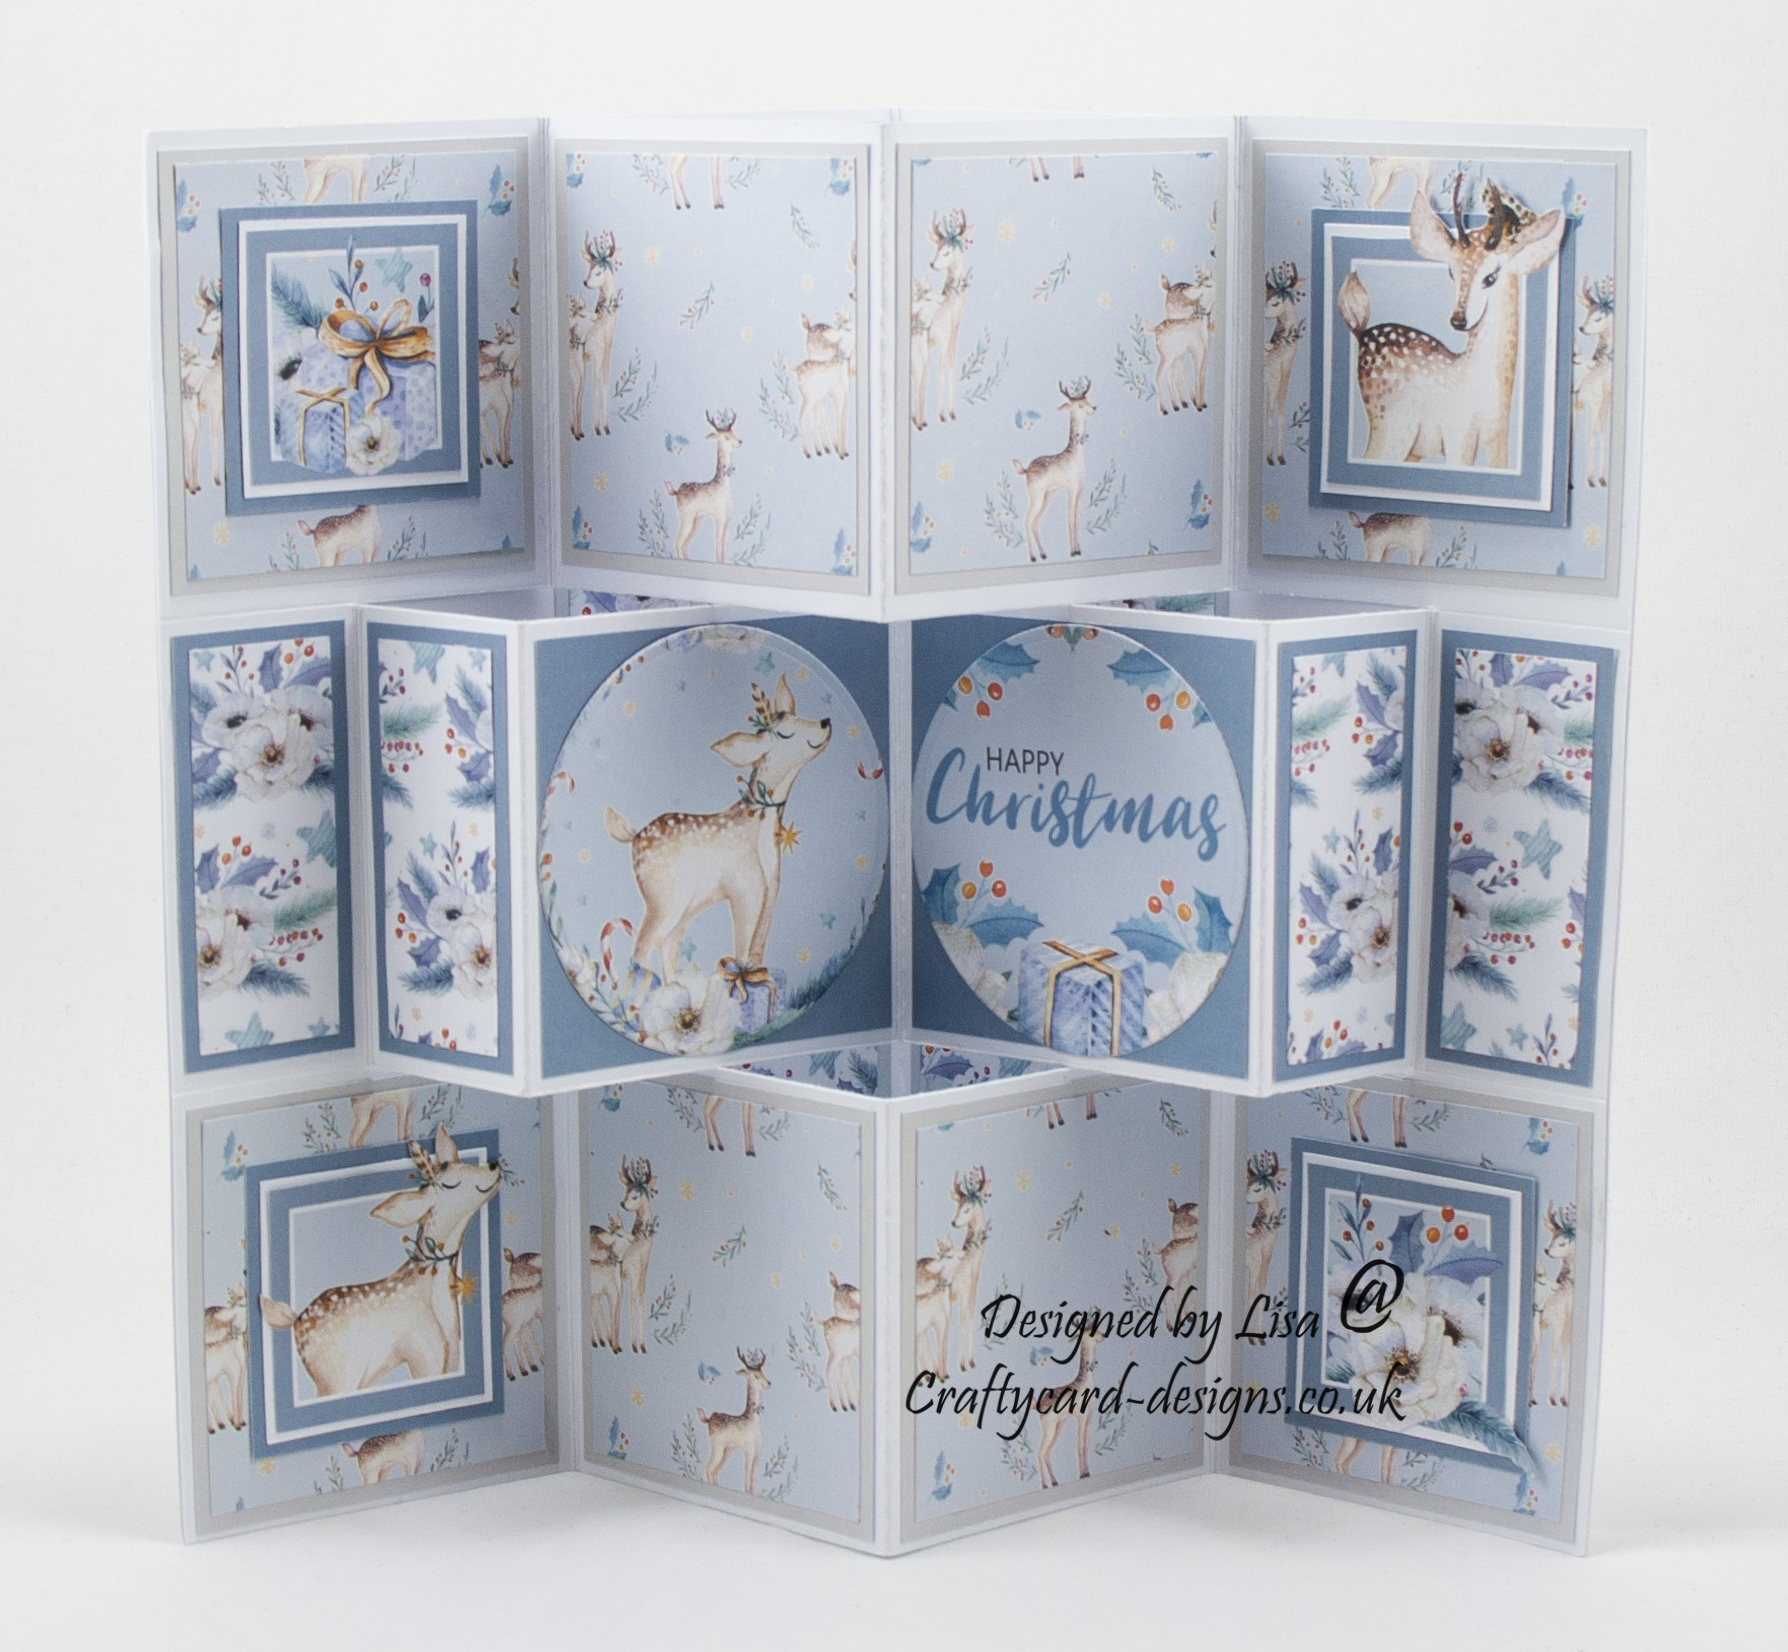
Today’s handmade card is a tri-fold shutter card using A Christmas Visitor paper collection from Creative Crafting World.
Instead of having the tri-fold design as the main card base I have attached it to the inside of my card design.
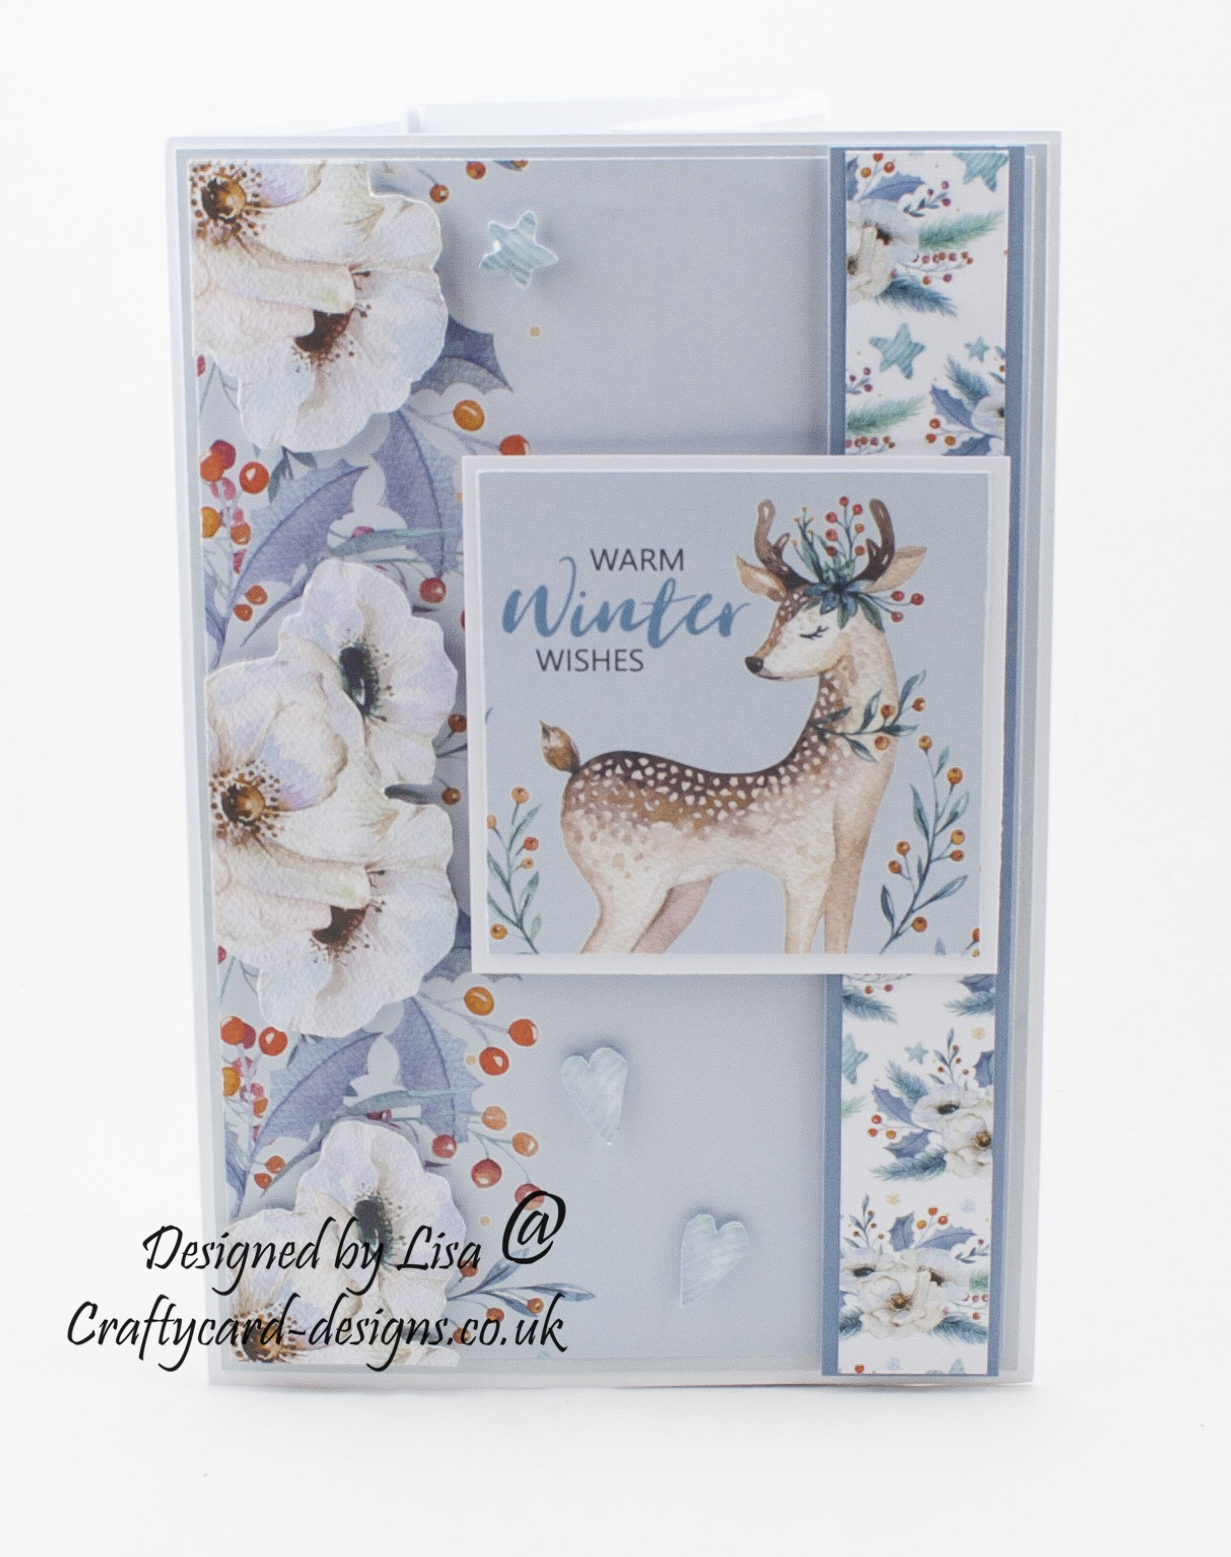
Here is a tutorial on how I created this card.
You will need :
A4 White Card
The Paper Boutique A Christmas Visitor – Paper Kit With Toppers
The Paper Boutique A Christmas Visitor – Insert Collection
The Paper Boutique A Christmas Visitor – Embellishment Pad
The Paper Boutique A Christmas Visitor – Coloured Card Collection
White Card
Circle Dies
Glue / Double Sided Tape
Foam Pads
Instructions:
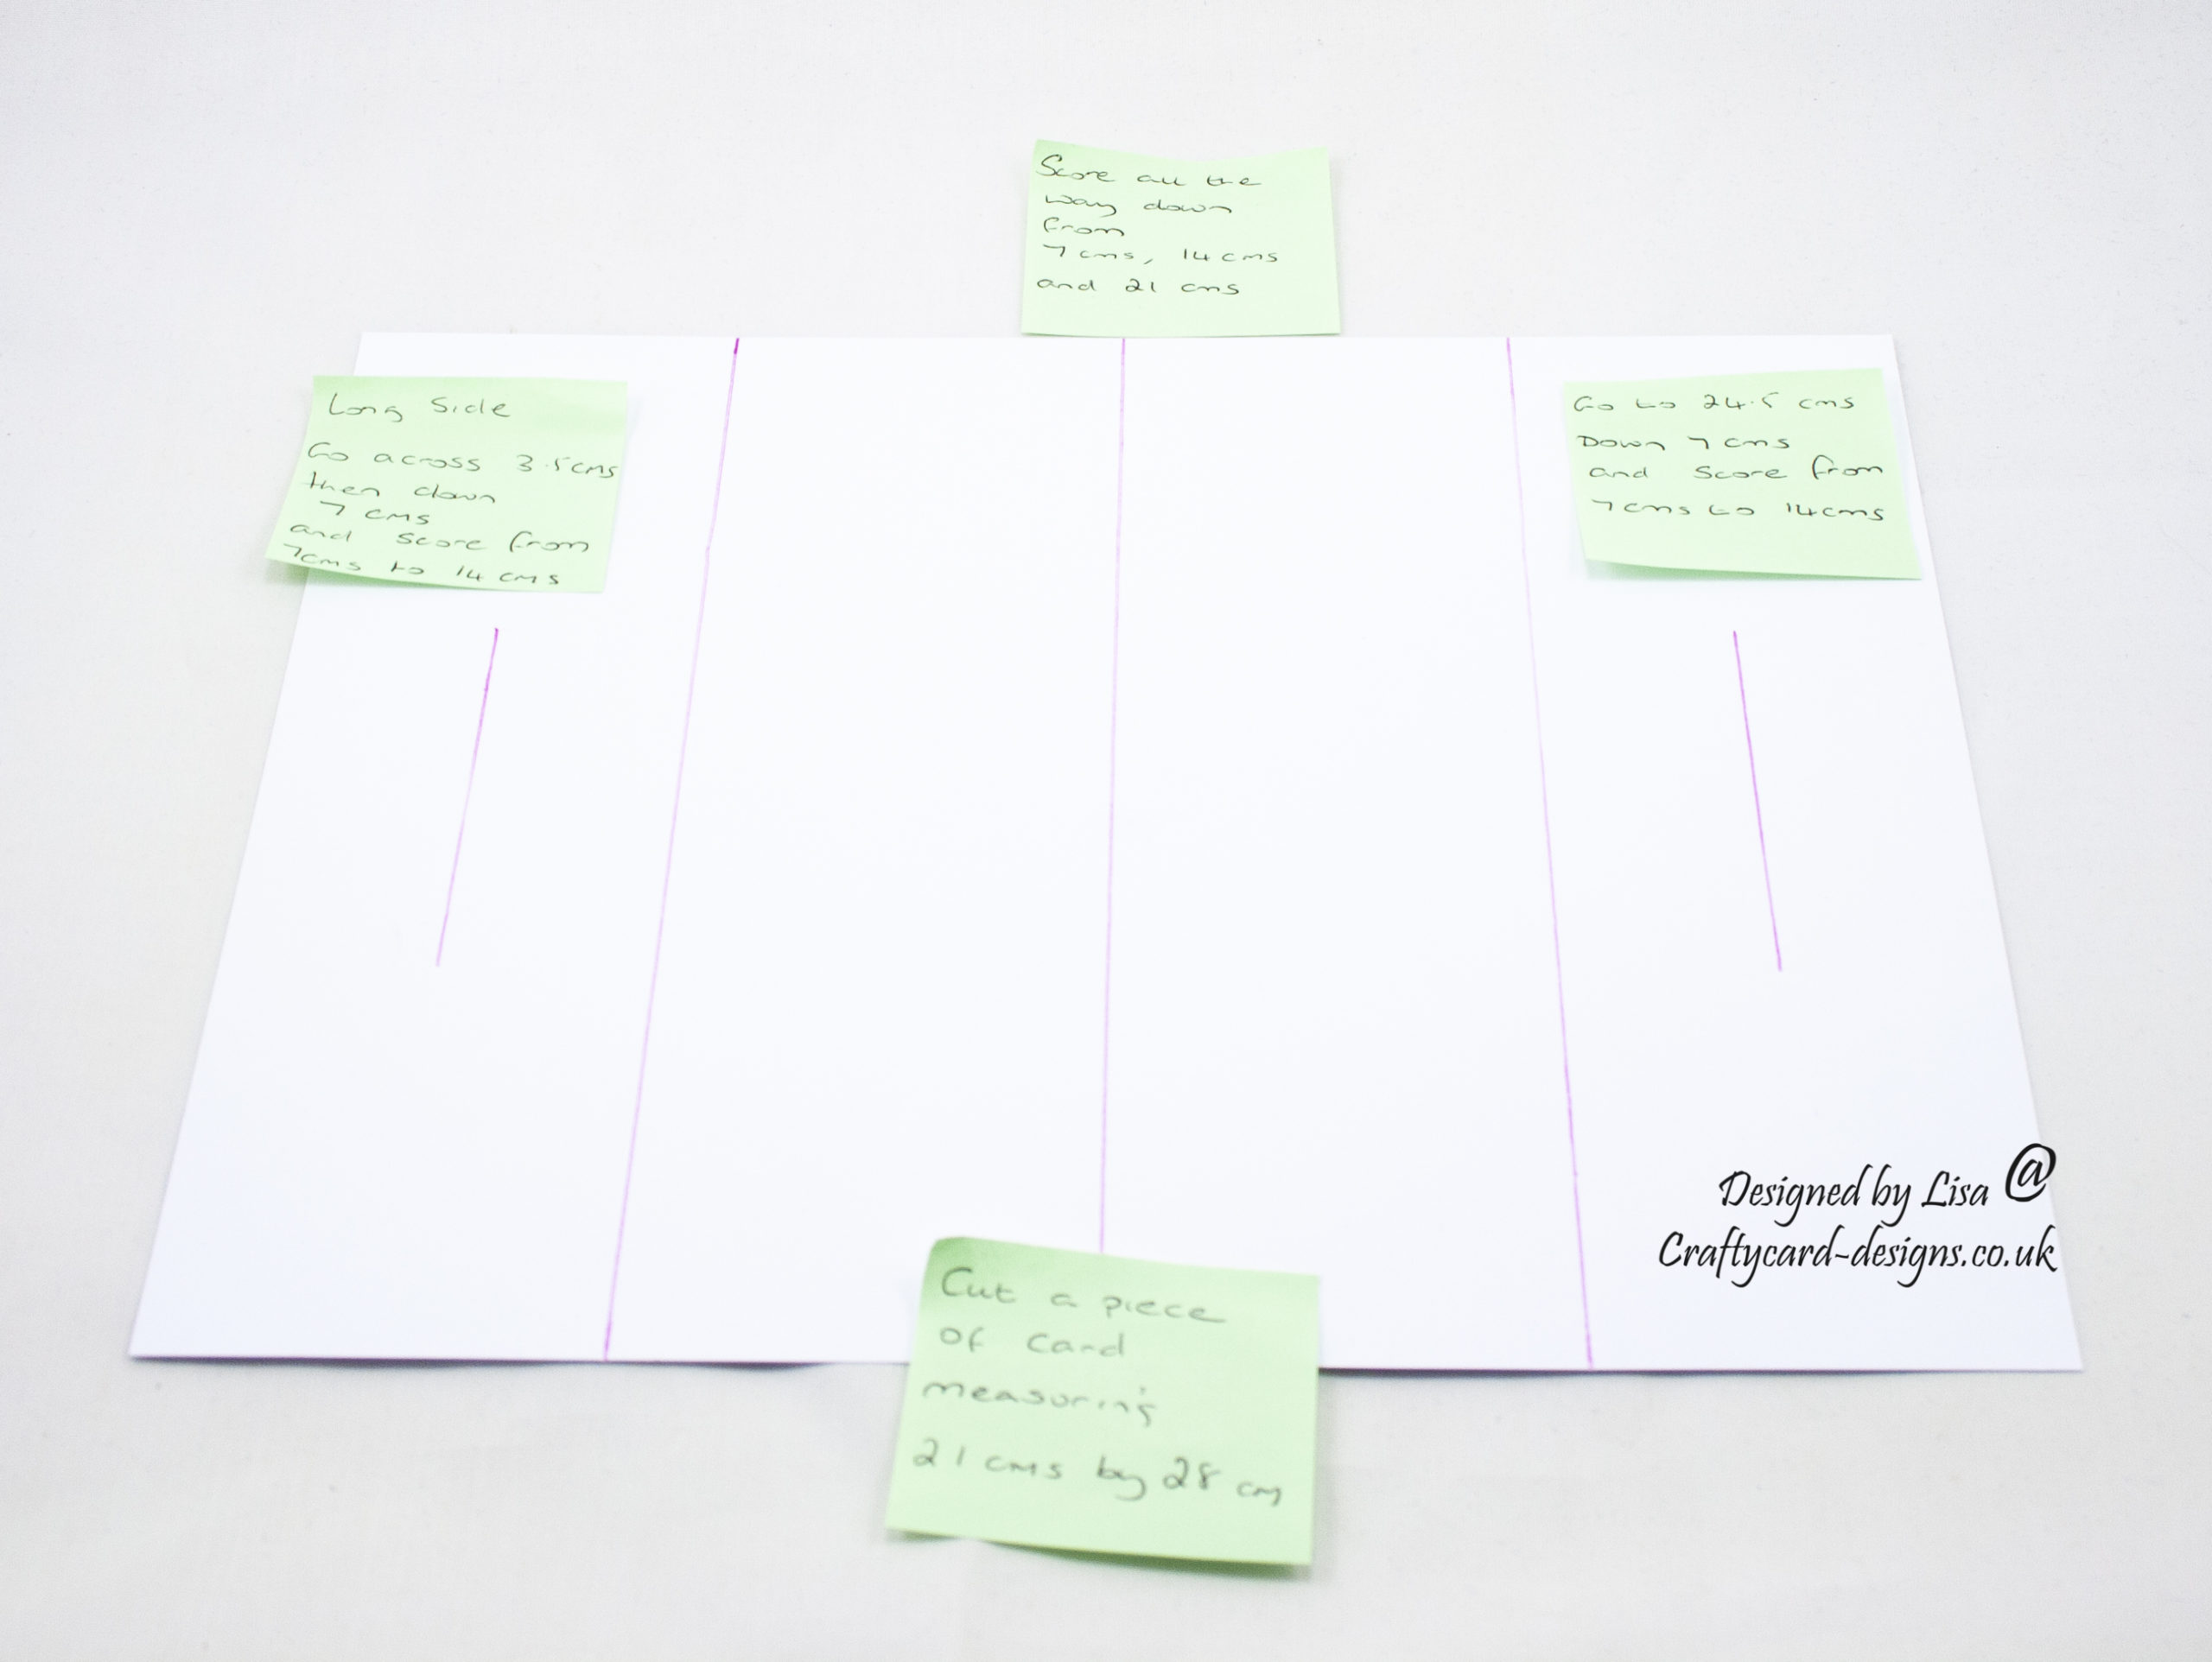
Cut two pieces of card measuring 28 cms by 21 cms.
Score and fold one at 14 cms to make the outer card base.
From the paper collection, choose two coloured cards, two papers, four small square toppers, three larger toppers, two of the same insert and one border strip.
Inside Tri-fold Shutter Part
Using the second piece of white card, on the long side, go across 3.5 cms and down 7 cms without marking the card.
Then score down from 7 cms to 14 cms.
Next from the top, score all the way down at 7 cms, 14 cms and 21 cms.
Go across to 24.5 cms and down 7 cms, without marking the card.
Then score from 7 cms to 14 cms.
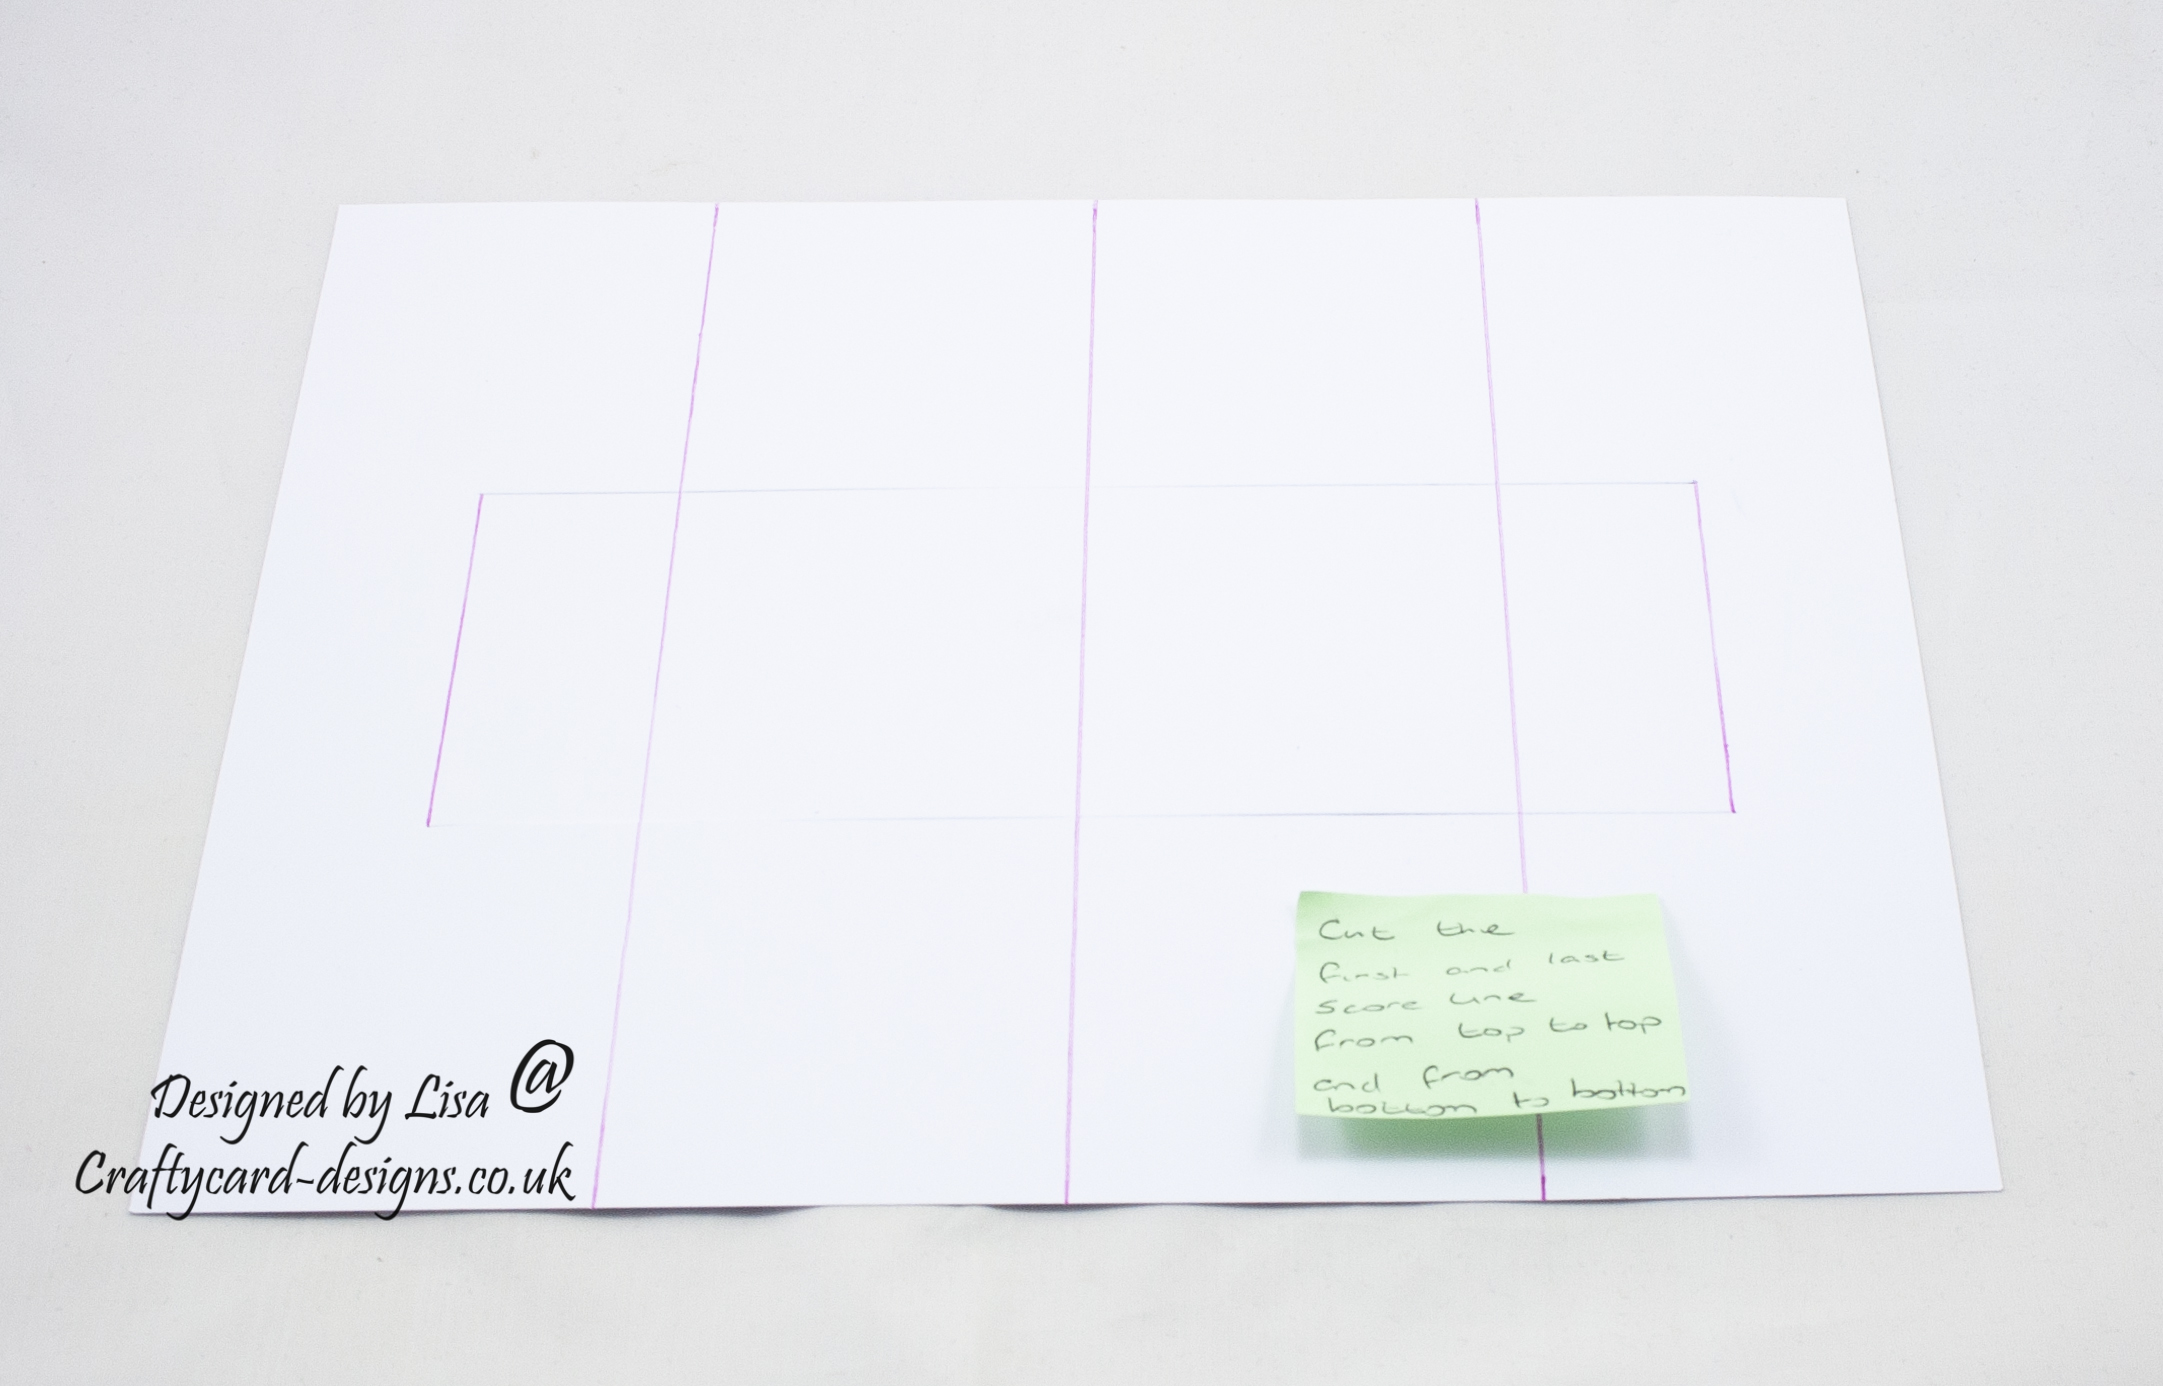
Cut straight across from the top of the first score line, on the left, to the top of the last score line on the right.
Then cut straight across from the first bottom score line, on the left, to the last score line on the right.
To get the correct folds, fold the top and bottom sections:
valley fold
mountain fold
valley fold
Then fold the middle section:
valley fold
mountain fold
valley fold
mountain fold
valley fold

This card is then attached to the inside of the first card base.
Layer one:
Cut two pieces from the first coloured card measuring 20.5 cms by 6.5 cms.
Cut two pieces from the first paper measuring 20 cms by 6 cms.
Matt and layer together and attach to the inside of the first card base towards the centre.
This will then take away the white of the card base when the card is fully attached together.
Layer two:
Cut a piece from the first coloured card measuring 20.5 cms by 13.5 cms.
Cut the insert to measure 20 cms by 13 cms.
Matt and layer together and attach to the front of the first card base.
Using the second insert, cut out some of the images and using foam pads, decoupage to the front of the first card base.
Layer three:
Cut a piece from the second coloured card measuring 20.5 cms by 3 cms.
Matt and layer with the border strip.
Attach to the front of the first card base on the right, using foam pads.
Layer four:
Cut a square from white card measuring 8.5 cms by 8.5 cms.
Matt and layer with one of the larger toppers.
Attach to the front of the first card, slightly over lapping layer two and three.
Layer five:
Cut a piece from the first coloured card measuring 20 cms by 13 cms.
Cut the insert to measure 19.5 cms by 12.5 cms.
Matt and layer together and attach to the back of the first card base.

Layer six:
Cut eight squares from the first coloured card measuring 6.5 cms by 6.5 cms.
Cut eight squares from the first paper measuring 6 cms by 6 cms.
Matt and layer together and attach to the top and bottom squares of the second card base.
Layer seven:
Cut four pieces from the second coloured card measuring 6.5 cms by 3 cms.
Cut four pieces from the second paper measuring 6 cms by 2.5 cms.
Matt and layer together and attach to the middle of the second card base.
Layer eight:
Cut two squares from the second coloured card measuring 6.5 cms by 6.5 cms.
Using a circle die, cut two circle toppers from two of the larger toppers.
Matt and layer together and attach to the middle of the second card base.
Layer nine:
Cut out four squares from the second coloured card measuring 4.5 cms by 4.5 cms.
Matt and layer with the four smaller square toppers.
Attach to the top and bottom corners of the second card base.
Next attach to the inside of the first card base.
Only add adhesive to the sides, no more than 3 cms from the edges.
………………………………………………………………………….
Thank you for visiting my blog and please feel free to follow and make any of my handmade card tutorials.
If you would like to see other cards I have made please have a look here:
A Christmas Visitor – Especially For My Friend
Christmas Doves – May The Blessing Of The Season Be Yours
A Christmas Visitor – Mum And Dad
Butterfly Surprise – Happy Birthday
Garden Visitors : Sending You Birthday Wishes
Garden Visitors Paper Collection
A Christmas Visitor – Sending Best Wishes
………………………………………………………………………….
Challenges I would like to enter are:
The Paper Players Challenge PP570 – Winter Wonderland
The Corrosive Challenge #12 – Anything Goes
Dragonfly Dreams Challenge December – Anything Goes
613 Avenue Create Challenge #12 – Anything Goes / Optional Twist Any Holiday
Your card is beautiful and so well crafted! I love your paper choices!
Our sister blog, A Place To Start , is hosting a “Blue Christmas” challenge this month and I think your card would be a perfect entry!
Thanks so much for stopping by our house at 613 Avenue Create!
Hugz,
Chana Malkah,
A Place To Start, Owner
613 Avenue Create, Owner
Redora Lee Designs , My Blog
Shopping Our Stash, DT
The Color of Cards, Owner
Absolutely wonderful and amazing and thanks so much for the instructions. Thanks so very much for joining us this time at the Dragonf Dreams Challenge, Elizabeth
WOW stunning card love all the images and beautiful papers.Thank you for the instuctions too.Thank you for joining us at 613 Avenue Create
Carol DT x
Hi, it is a very nice card, with beautiful colors. Thanks for the photo-tutorial, very clearly explained. Thank you for joining our Challenge on the Corrosive Challenge Blog
Haideelum
Coordinator Corrosive Challenge Blog
Wow, this is stunning! What an eye-catching card! Love those papers and of course, the folds are amzing! Thanks for playing with the Players this week with this lovely creation!
What a wonderful card. It must have taken you ages to create – but it was so worth it! So glad you shared this beauty with us at the Paper Players this week
Jaydee
Congratulations! You were chosen as a Top Rocker at 613 Avenue Create for the week of December 5-11, 2021!
Thanks so much for sharing your creativity with us and our players. Please stop by our blog and grab your Top Rocker Badge!
Hugz,
Chana Malkah,
A Place To Start, Owner
613 Avenue Create, Owner
Redora Lee Designs , My Blog
Shopping Our Stash, DT
Hi!, your card is beautiful, thanks for the tutorial! Thanks for participating!