Here are three handmade A5 cards I have created using a Paper Boutique paper collection from Creative Crafting World called Perfect Partners along with new alphabet dies called Beyond Alphabet Collection.
The paper collection comes in Lovely Lavender, Powder Blue, Fresh Green and Dusky Pink.
Card One

Here is a tutorial on how I created this card.
You will need :
A5 White Card
The Paper Boutique Perfect Partners – Lovely Lavender Paper Pad
The Paper Boutique Perfect Partners – Powder Blue Paper Pad
The Paper Boutique Perfect Partners – Fresh Green Paper Pad
The Paper Boutique Perfect Partners – Dusky Pink Paper Pad
The Paper Boutique Beyond Alphabet Collection
The Paper Boutique Lovely Lattice – Posy Embellishment Die Collection
White Card
White Ribbon
Small Pearl Beads
Wet Glue / Double Sided Tape
Foam Pads
Instructions:
Choose six papers from the paper pads, two plain and four patterned.
Layer one:
Cut a piece from one of the plain papers measuring 20 cms by 10 cms.
Cut a piece from one of the papers measuring 19.5 cms by 9.5 cms.
Matt and layer together and attach to the card base on the left.
Layer two:
Using the two different size circle dies from the alphabet die collection, cut three large circles in the same plain paper and three smaller circles in the same patterned paper as layer one.
Matt and layer together using foam pads and attach to the card base on the right.
Next using the letters cut out the word mum from white card and attach to the circle die cuts.
Using the small heart embellishment die, cut four out from the plain paper and attach them in between the circle die cuts.
Layer three:
Using the flower dies from the posy embellishment collection, make up three flowers using all the papers.
Then using the leaf die cut out two leaves from the second plain paper.
Next cut out three strips from the second plain paper, these will be the flower stems.
Add the flowers, leaves and stems to layer one. Please see picture for reference.
Attach a bow to the flower stems and pearl beads to the centre of the flowers.
To finish cut a small butterfly and dragonfly from the alphabet die collection out from white card and attach to layer one.
Card Two
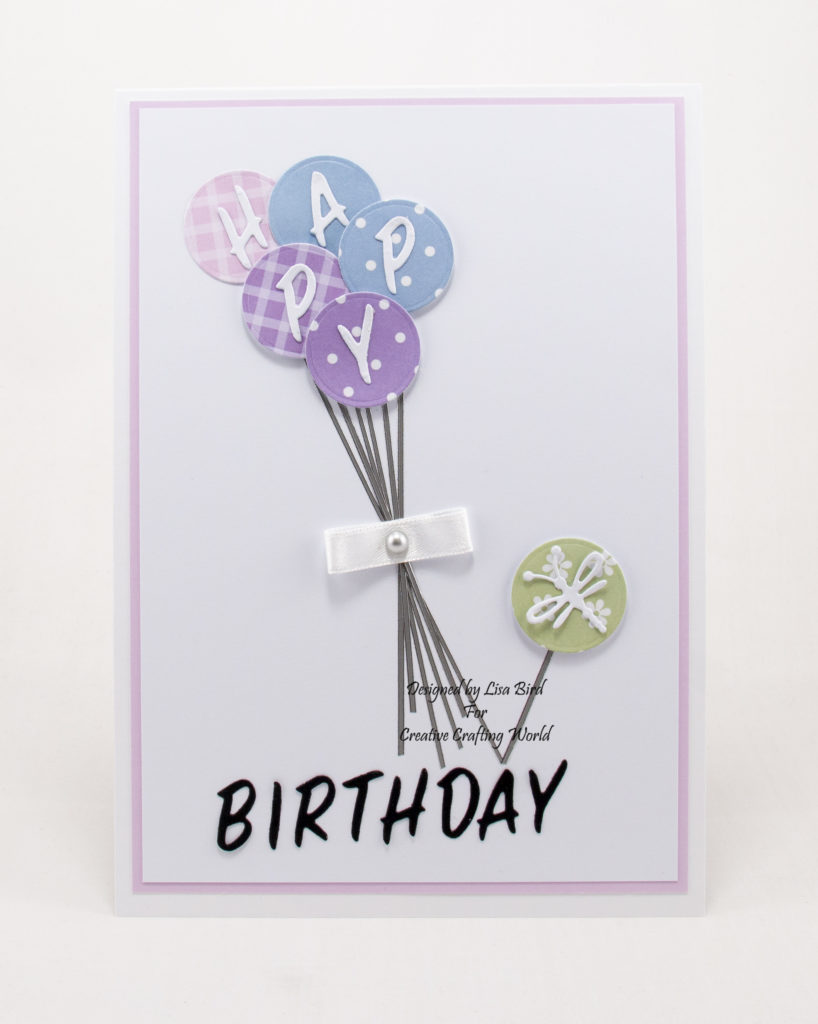
Here is a tutorial on how I created this card.
You will need :
A5 White Card
The Paper Boutique Perfect Partners – Lovely Lavender Paper Pad
The Paper Boutique Perfect Partners – Powder Blue Paper Pad
The Paper Boutique Perfect Partners – Fresh Green Paper Pad
The Paper Boutique Perfect Partners – Dusky Pink Paper Pad
The Paper Boutique Beyond Alphabet Collection
White Card
Silver Peel Off Strips
Small Pearl Bead
White Ribbon
Wet Glue / Double Sided Tape
Foam Pads
Instructions:
Choose six patterned papers from the paper pads and one plain paper.
Layer one:
Cut a piece from one of the plain papers measuring 20 cms by 14 cms.
Cut a piece from white card measuring 19.5 cms by 13.5 cms.
Matt and layer together and attach to the card base.
Layer two:
Using the alphabet dies cut out the word happy in white card and birthday in black card.
Attach the word birthday to the bottom of the card base.
Layer three:
Using one of the circle dies from the alphabet collection cut out six circles from each of the patterned papers.
Attach five of the circles die cuts as if they were a bunch of balloons to the top left of the card base, using foam pads on some.
Then attach the letters happy to the circle die cuts.
Next attach the silver peel off strips coming off the circle die cuts as if they were balloon strings.
Add a white bow to where the peel off strips meet with a silver bead in the centre.
Layer four:
Attach the sixth circle die cut to the card base on the right adding a silver peel off like before.
Cut out the small dragonfly from white card and attach to the sixth circle die cut.
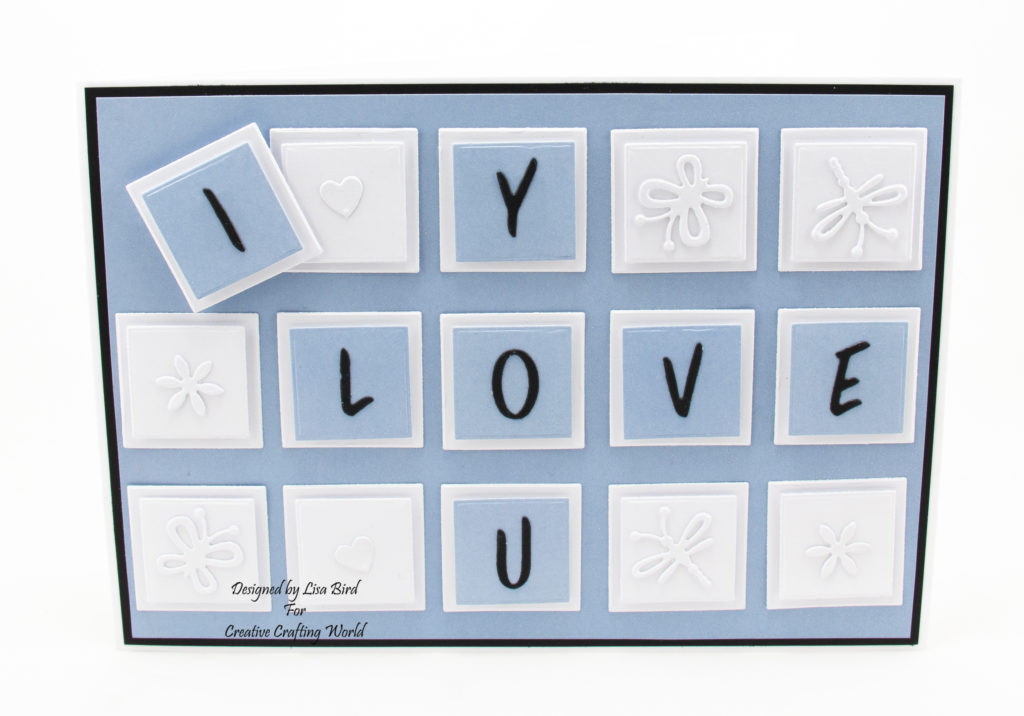
Card Three
Here is a tutorial on how I created this card.
You will need :
A5 White Card
The Paper Boutique Perfect Partners – Powder Blue Paper Pad
The Paper Boutique Beyond Alphabet Collection
White Card
Wet Glue / Double Sided Tape
Foam Pads
Instructions:
Choose one plain paper.
Layer one:
Cut a piece from black card measuring 20.5 cms by 14.5 cms.
Cut a piece from the plain paper measuring 20 cms by 14 cms.
Matt and layer together and attach to the card base.
Layer two:
Using the largest square die from the alphabet die collection, cut out fifteen squares from white card.
Then using the smaller square cut out seven squares from the plain paper and eight squares from white card.
Matt and layer together using foam pads and attach them in rows of three on to the card base. Putting the first square set at a sight angle. Please see picture for reference.
Layer three:
Using the alphabet dies cut out the word I Love U from black card.
Attach each letter to a blue square.
Then using the small embellishments cut eight out from white card and attach them to the white squares.
………………………………………………………………………….
Thank you for visiting my blog and please feel free to follow any of my handmade card tutorials.
Please leave a comment and let me know you’ve visited.
If you would like to see other cards using Creative Crafting World products please have a look here:
The Walled Garden – Especially For You
A Garden In Provence – Birthday Wishes
A Traditional Christmas – Magical
A Whisper Of Autumn – Follow Your Dreams