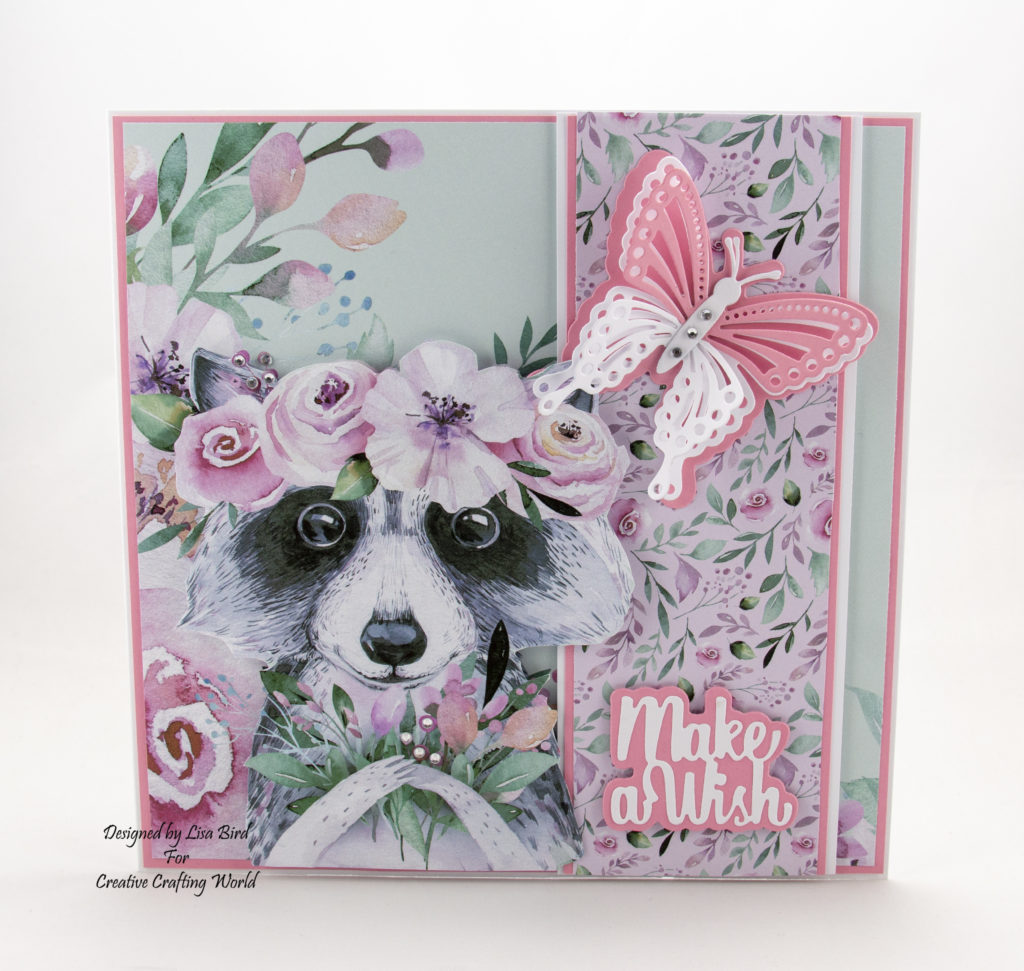
Today’s handmade card has been created using the new paper collection from Creative Crafting World called ‘The Magical Forest’.
This is another paper collection from The Paper Boutique range.
I have also used dies from The Paper Boutique Floral Die Collection.
Here is a tutorial on how I created this card.
You will need :
8″ by 8″ White Card
The Paper Boutique The Magical Forest Paper Kit
The Paper Boutique The Magical Forest Insert Collection
The Paper Boutique Floral Collection – Beautiful Butterflies Cutting Dies
The Paper Boutique Sentiments Volume III – Make A Wish
Woodstock Card
White Card
Small Silver Gems
Wet Glue / Double Sided Tape
Foam Pads
Instructions:
Using pink card from the woodstock collection cut a piece measuring 20 cms by 20 cms.
Then using the insert with the Racoon on cut it down to measure 19.5 cms by 19.5 cms.
Making sure that the Racoon image is not trimmed.
Matt and layer together and attach to the card base.
Next using white card cut a piece measuring 20 cms by 7.5 cms.
Then cut a piece from pink woodstock card measuring 20 cms by 7 cms.
Using one of the papers from the paper kit cut a piece measuring 20 cms by 6.5 cms.
Matt and layer together and using foam pads attach to the right of the card base.
Using a second insert cut out the Racoon image.
Attach to the card base using double foam pads slightly over lapping the last layer.
Add small silver gems to the berries.
Then using a butterfly from the Beautiful Butterflies die collection, cut the matt layer out in pink woodstock card.
Cut the butterfly out in pink woodstock card and two out in white card.
Cut the centre of the butterfly out in white card.
Attach the white butterfly to the pink matt layer.
Then cut the top half of the pink woodstock butterfly and the bottom half of the white butterfly.
Attach each halves to the butterfly layer and then add the butterfly body.
Attach to the card base and add small silver gems.
Using the sentiment cut the matt layer out in pink woodstock card.
Cut the sentiment out in white card.
Matt and layer together and attach to the card base.
Thank you for visiting my blog and please feel free to make any of my card designs.
Please leave a comment and let me know you’ve visited.
If you would like to see other cards using Creative Crafting World products please have a look here:
The Magical Forest – Especially For You
The Magical Forest – Make A Wish
Wow i Love your card
Aw this is so sweet,
Hugz Tinz