Today’s handmade easel card has been created for the new challenge at I Love Promarkers Blog Challenge #388 that starts today.
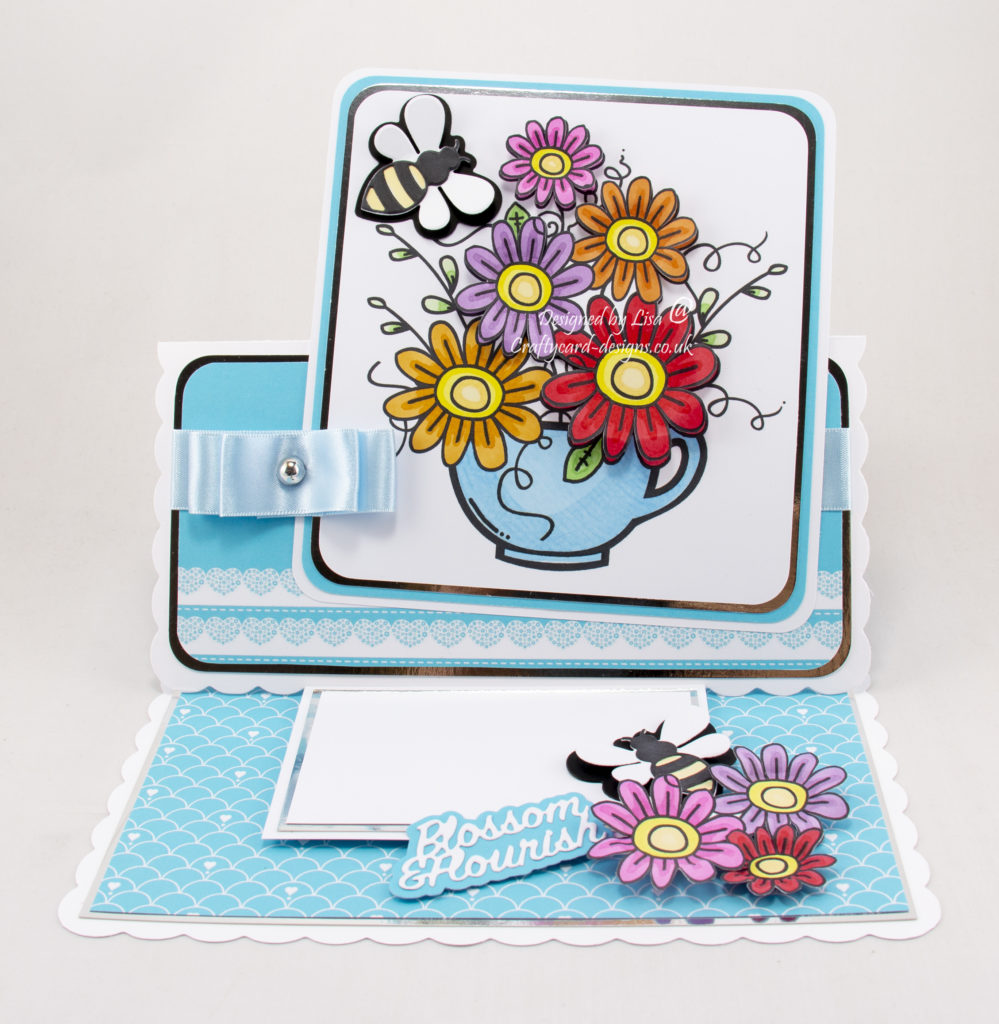
I have used a digi image from Bugaboo Stamps called Teacup Flowers 1.
The optional theme for this challenge is one for the girls, but you must use either promarkers, flexmarkers, aquamarkers or trias on your work.
Here is a tutorial on how I created this card.
You will need :
8″ by 8″ White Scallop Card
Bugaboo Stamps : Teacup Flowers 1
Creative Crafting World : Perfect Forever Companions Dvd-Rom
The Paper Boutique Springtime Blooms – Sentiments Volume XIII Die Collection
The Paper Boutique Floral Delights Collection – Dragonflies & Bee Die Collection
Promarkers
White Card
Silver Mirri Card
Black Card
Blue Ribbon
Silver Pearl
Wet Glue / Double Sided Tape
Foam Pads
Instructions:
Firstly score and fold the front of the card base in half.
This is to make an easel shape card for this design.
Next Print the Teacup Flowers 1 digi image three times.
Cut one digi image to measure 14 cms by 13 cms and colour the bottom left flower and cup.
Then colour the other four flowers on the second digi image and cut out.
Attach them to the first digi image using foam pads.
On the third digi image colour three flowers and cut out.
Put them to one side to use later on.
The promarkers used were :
Cup: Arctic blue
Flower Petals: Lipstick, cerise, amethyst, gold, pumpkin.
Flower Centre: Lemon, buttercup.
Leaves: Meadow green, apple.
Bees: Black, buttercup.
From the dvd-rom choose and print out two papers.
Cut a square from silver mirri card measuring 19 cms by 19 cms.
Cut a square from one of the papers measuring 18.5 cms by 18.5 cms.
Matt and layer together and attach to the bottom of the card base.
Cut a piece from silver mirri card measuring 9 cms by 19 cms.
Cut a piece from the second paper measuring 8.5 cms by 18.5 cms.
Matt and layer together and add a piece of blue ribbon across the centre.
Attach to the front fold of the card base.
Next cut a piece from white card measuring 15.5 cms by 15.5 cms.
Cut a piece from one of the papers measuring 15 cms by 15 cms.
Then cut a piece from silver mirri card measuring 14.5 cms by 13.5 cms.
Matt and layer together and add the digi topper.
Attach to the front fold of the card base on the right at a slight angle.
Make a bow up and attach to the left side of the digi topper.
Add a silver pearl to the centre of the bow.
Cut a piece of white card measuring 7 cms by 11 cms.
Cut a piece of silver mirri measuring 6.5 cms by 10.5 cms.
Then cut a piece of white card measuring 6 cms by 10 cms.
Matt and layer together and attach to the bottom of the card base using foam pads.
This will make a stopper for the front fold and a place to write a message.
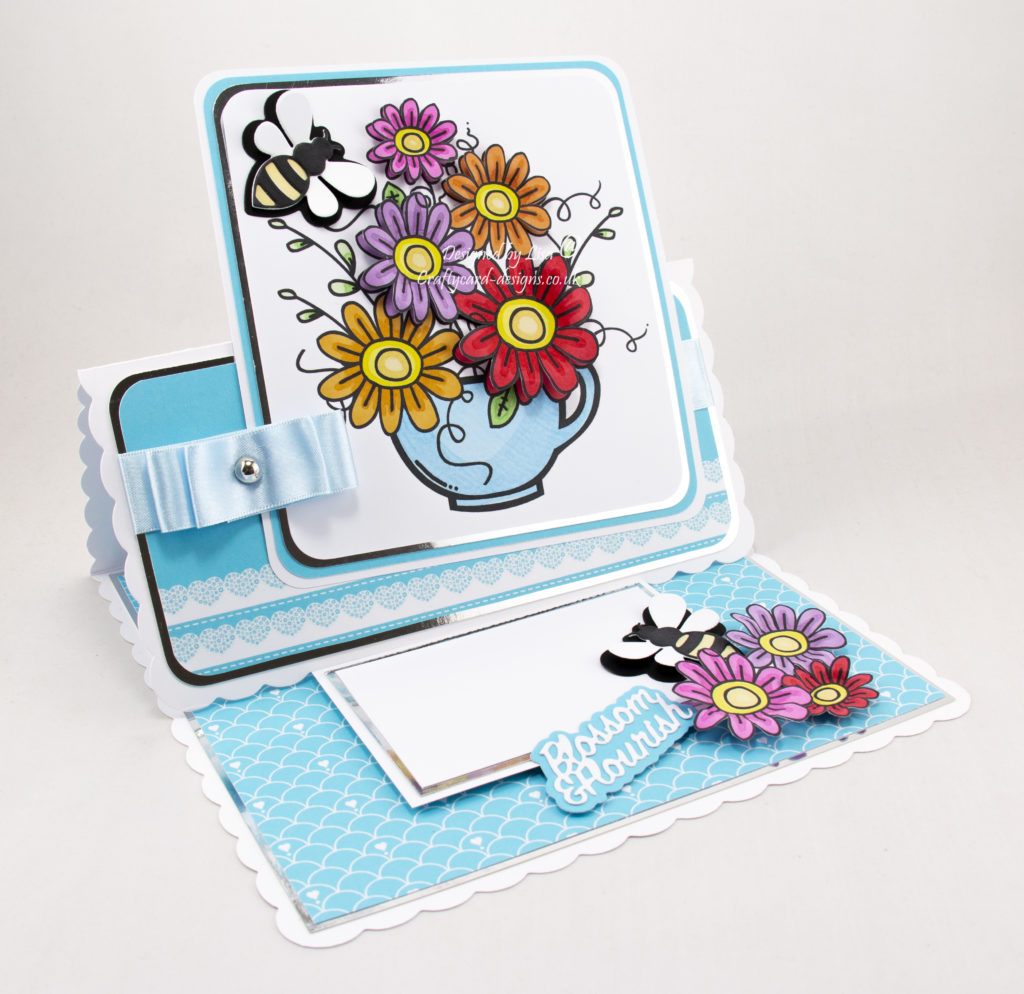
Next using the bee die set make two bees.
Cut the matt layer out in black card.
Cut the wing layer and bee body out in white card.
Colour the top bee body using a black promarker and attach to the wing layer.
Using the buttercup promarker highlight the stripes on the bee’s bodies.
Add these layers to the black matt layer.
Attach one bee to digi topper and one to the right bottom corner of the stopper.
Add the three digi flowers to the right bottom corner of the stopper, slightly overlapping the bee.
To finish add a sentiment.
Cut the matt layer out in one of the papers and the sentiment out in white card.
Matt and layer together and attach to the bottom of the stopper.
………………………………………………………………………….
Thank you for visiting my blog and please feel free to make any of my card designs.
Please leave a comment and let me know you’ve visited.
If you would like to see other cards made for I love Promarkers please have a look here:
Sunbonnet Birthday Cake – Birthday Wishes
Live Life In Full Bloom – Hydrangea
………………………………………………………….
Challenges I would like to enter are:
CD Sunday Challenge 14 : Anything Goes As Long As A Craft Cd Has Been Used Somewhere.
613 Avenue Create Challenge 223 : Anything Goes / Optional Twist Use Your Country’s Flag Colours
Love To Craft Challenge 36 : Anything Goes
A Perfect Time To Craft Challenge 7 : Anything Goes
Always Fun Challenge 118 : Anything Goes
Gorgeous card Ginny
My Blog As I do Rodos
Beautiful, i love the bold bright colours. Thank you for sharing at CD Sundays.
Lovely card. I love the addition of the bow…..so pretty. Thank you for sharing it with us at CDSunday WynnDT
Beautiful card, with a beautiful image
Thank you joining us
Margaret
CD Sunday DT
What a fabulous bright cheery card. Thank you for sharing with us at CD Sunday.
Jocelyn x
CD Sunday DT
Wonderful design and colours. They really pop out.
Thank you for joining in with my hosted challenge.
Carol xx
CD Sunday DT
Thanks so much for sharing both your fabulous project and the instructions for making one of our own! We look forward to seeing more of your work at 613 Avenue Create!
Hugz,
Chana Malkah, Owner/Designer
613 Avenue Create Challenge
A Place to Start Challenge https://hereisaplacetostart.blogspot.com
Love this fun flip card. You did an outstanding job with your coloring. Thank you for sharing with us over here at “A Perfect Time To Craft” and best of luck with your entry.
Adam DT for http://aperfecttimetocraft.blogspot.com.au/
Such a wonderful, bright and funky creation with lots of detail to admire. I love the layout , so beautifully and professionally done and so inspiring. Thank you so much for joining in the challenge at ‘613 Avenue Create’ and good luck. Tina Chianna DT